- Less network traffic, from 34% to 52% less, using network compression.
- Faster data updates using streaming replication to get a 36% to 45% reduction in replication time.
- Higher server availability with automatic restart and recovery.
- Increased user satisfaction with as much as a 30% improvement in response time.
- Reduced server resource usage with up to a 23% reduction in CPU utilization, enabling more users per server.
- Faster data transmissions, up to 50% faster, using attachment compression, network compression, and streaming mode replication.
- Supporting more users - Performance improvements enable servers to handle more users with less CPU.
- Bandwidth and storage efficiencies - Accelerating delivery and saving storage.
- Easier administration and availability - Performance gains through better resource utilization.
- Server consolidation - Doing more with less.
- Lower data storage requirements with 45% to 65% size reduction using data compression. You get “more messages per MB”, and faster backups of the same data.
- Increased server consolidation by supporting multiple versions or partitions, and multiple languages, on the same server
- Better workload balancing with statistics from activity trends and Tivoli analyzer.
The Hardware and OS Requirements for Solaris Domino R6 are listed in the table below. These are general guideline requirements, but depending upon your environement and server load the resources might need to be increased.
OS: Solaris 8, Solaris 9 (see "Solaris patch requirements" below)
Free Disk Space: 1 GB (3x raw swap space)
CPU: Ultraspark or newer (200 Mhz or higher)
Memory: 256 MB Recommended
Review the Solaris Domino R6 release notes below prior to upgrading your server, so you are aware of some possible issues that may arise.
Solaris platforms supported
Starting with Domino 6.0, Solaris 8 is a supported platform for the Domino server.
Starting with Domino 6.0.1 or higher, Solaris 9 is a supported platform for the Domino server.
Note: Domino 6.x only supports systems with UltraSPARC and newer processors.
Solaris system settings
The following changes should be made to the /etc/system file on the Solaris 8 server for Domino 6.
set rlim_fd_max=32768
set msgsys:msginfo_msgtql=1024
As root, make the changes as specified above, and then reboot the system.
Solaris patch requirements
Starting with Domino 6, the Solaris patches below are required for correct operation of the Domino server. IBM/Lotus realizes that additional patches may become publicly available following our initial certification testing, and we acknowledge that new updates may fix additional problems. You may wish to apply these newer patches as they become available.
You can obtain and install the following patches from Sun Microsystems or download them from Sun's Web site: http://www.sun.com.
Solaris 8
Oct. 4, 2001 Solaris patch cluster or later
(108434-03 patch and 108435-03 patch - only needed if doing 64bit stuff are contained in this, and also needed by compiler)
Server - Automatic Fault Recovery and NSD (Win32 and UNIX)
Domino server
Fault Recovery is a feature of Domino which enables a server that has crashed to shut itself down and then restart automatically, without any administrator intervention. When Domino encounters a situation which is considered a fatal error, each Domino process is terminated and all associated resources are released. The startup script (/opt/lotus/bin/server on Unix) detects the situation and restarts the server.
Fault Recovery is available for Domino for both the NT and UNIX platforms.
To enable Fault Recovery, select the Fault Recovery Enabled box in the server document of the Domino Directory
When Fault Recovery is enabled, the server password, if any, is securely stored in the system kernel memory area where it can be retrieved by a restarting server.
Fault Recovery supports Domino partitions. When a situation arises in a partition, only that partition is terminated and restarted. Other Domino partitions on the server are unaffected. Fault Recovery is also compatible with Domino Clusters, and in fact complements it well.
An optional program can be executed by the Fault Recovery system before any other cleanup takes place by using the CleanupScriptPath field in the server doc.
Unix Platforms:
Users should ensure that nsd is invoked if they want to collect information pertaining to the crash. If upgrading from a previous release, add the -batch option to allow redirection of the data to the nsd log file. New installations have the -batch option added automatically to the CleanupScriptPath field. (for example, /local/lotus/notes/latest/ibmpow/nsd.sh -batch)
By default, the cleanup script has 5 minutes to complete its execution, after which it is terminated. To override the default time of 5 minutes, use the CleanupTimeout field. For example, to increase the allowed time to 10 minutes:
CleanupTimeout=600
CleanupTimeout is specified in seconds and can range from 30 to 1800. Note that the cleanup script feature is available even if Fault Recovery is disabled.
The Crash Limits fields will put a limit on the frequency of crashes so that if the situation occurs that Domino crashes very early (in initialization) then after a the designated number of crash/recovery cycles the server will simply stop. The default limit is 3 crashes within 5 minutes.
Known Issues
- If you are using the Fault Recovery feature on Solaris, the number of available messages per message queue must be increased. To accomplish this, become superuser and add the following line to /etc/system and reboot:
set msgsys:msginfo_msgtql=1024
This needs to be set on Solaris because Fault Recovery uses message queues. The default for Solaris is 40 messages per queue, and Fault Recovery requires more than 40 messages in this queue. This setting increases it from 40 to the recommended setting of 1024.
- When running with Fault Recovery disabled, if the "Domino Halted. Type 'quit' to Terminate/Cleanup" message does not properly line-up, then continue to enter the "quit" command. The "quit" command should still be accepted, even if "quit" is not echoed back to the display.
- If your data directory (or subdirectory) contains a Symbolic Link to a directory, and the link name contains spaces, then the contents of the directory will not be included in the Data Directory Full Listing section of an NSD log.
- When running under the Domino Controller\Console, because the Domino Controller redirects standard I/O, the fault-recovery clean-up script (on UNIX) can not attempt to reset standard I/O operating parameters for the workstation via the stty command. Otherwise a message, similar to the following, may appear (Solaris example):
stty: tcgetattr: A Specified file does not support the IOCTL system call
Server Performance Monitoring Platform Statistics
Monitoring platform statistics
Domino 6 includes platform statistics that track the performance metrics of the operating system and store the results in the Domino server. For a full description of platform statistics, see the on-line help documentation. You can view the list and full description of the platform statistics from the Domino Administrator Configuration tab in the Monitoring Configuration - Name & Messages (Advanced) - Statistic Names view.
Solaris statistics notes
- Occasionally on certain machines, there may be some erroneous values for some statistics, which are generally on the high side. For example:
Platform.System.ContextSwitches = 26,571,732.1
Platform.System.PctlCombinedCpuUtil = 2,605,697
Platform.PctTotalUserCpuUtil.Peak = 4,821,546.7
When this occurs, use the Platform Reset Interval Enable command to reset Platform Statistics to zero. This resets relevant statistic values to zero and prevents the generated erroneous values from being used in future calculations. After credible statistic values begin to be reported, use the command Platform Reset Interval Disable so that statistic values do not continue being reset to zero.
- The statistic Platform.LogicalDisk.<InstanceNumber>.ServiceTimeinmsecs reports the average service time of a given logical disk. There is a significant difference between the values reported by Platform Statistics and those reported using the system command iostat. The values reported by Platform Statistics are in agreement with values generated by running the system command kstat, but tend to be smaller than the iostat values.
- Process CPU values reported by the statistic Platform.Process.<ProcessName.InstanceNumber>.PctCpuUtil may be under reported when workloads are heavy. Use the system command prstat to find out details on process CPU usage. Refer to the man pages for details on using prstat.
Default clock type behavior has changed
In releases prior to Domino 6 for AIX, Solaris, Linux, iSeries, and zSeries platforms, the clock type used by the Domino server defaulted to a 12-hour format. For Domino 6, the default clock type is now inherited from the operating system date/time format configuration.
The Domino 6 server inspects a locale keyword named "d_t_fmt" in a category "LC_TIME" to decide the default clock type. As a result, you may see the time format used by the Domino server has changed to a 12-hour format after upgrading.
Workaround
If you want to retain the clock type as 12-hour, you can do one of the following:
- Change the locale to one which uses a 12-hour format for starting the Domino 6 server. For example, the locale "en_US" on Linux and Solaris platforms uses a 12-hour clock.
- Specify the Notes.INI setting "ClockType=12_HOUR" to override the system default clock type.
PANIC: Cannot attach to shared memory region
This error may happen on servers with very high process local memory usage. An example would be the http server serving up large databases or if port compression is enabled. In Domino the private and shared memory must reside in a limed virtual address space, which is usually 4 gigabytes. This error happens when Domino runs out of virtual memory. In order to prevent this from happening there are 2 new notes.ini entries:
ConstrainedSHM=1
ConstrainedSHMSizeMB= size in mega-bytes
The ConstrainedSHM=1 will restrict shared memory to a set of default sizes as follows:
Windows and Mac platforms 2 giga-bytes
AIX platforms 2.4 giga-bytes
Solaris and Linux 3 giga-bytes
The ConstrainedSHMSizeMB="size in mega-bytes" will restrict memory to the size in mega-bytes specified.
The PercentAvailSysResources may also be used if partition servers are used. Please see the Domino Administrator 6 Help for information on setting PercentAvailSysResources.
All of these Notes.INI values interact as follows:
On AIX (a segmented memory platform) :
In essence Domino takes the lower of "Mappable shared memory size Dynamic from maxdata" ,"ram on the system * (PercentAvailSysResources/100)", "Notes.ini ConstrainedSHMSizeMB" and "ConstrainedSHM". It should be noted that ConstrainedSHMSizeMB will round down on AIX only to a 256 mega-byte boundary. example if set to 650 the it will be set to 512.
On all other platforms:
In essence Domino takes the lower of "ram on the system * (PercentAvailSysResources/100)", "Notes.ini ConstrainedSHMSizeMB" and "ConstrainedSHM". Domino will size it's shared memory usage to live within the limits derived above.
*** Steps to upgrade a standalone UNIX Domino server
In this section we have detailed the upgrade steps for a standalone Domino server for Linux, but the instructions are applicable for all supported UNIX platforms.
1. For the purpose of this example, the Linux user that is used to run Domino is notes and the Domino server name is DominoUnix. When we start we are logged on as notes-not as root.
Ensure that your R5 server is not running. At the operating system level, issue the following command:
[notes@DominoUnix data]$ ipcs | grep 0xf81f
If you server is down, no output must be displayed, otherwise clean-up all semaphore and memory segments by running:
[notes@DominoUnix data]$ nsd -kill
2. Change to root user at an OS command prompt and go to your directory where you untar your install file.
3. Execute ./install file and press Enter to validate.
4. A welcome screen will be displayed as shown in Figure 6-9, use the Tab key to validate.
Attention: Be sure that you are root user,-not notes-to install the Lotus Domino code. You can easily check this from the command prompt, since the prompt contains root instead of notes.
[root@DominoUnix data]#
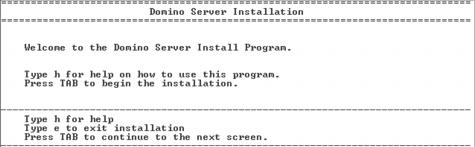
Figure 6-9 Domino Welcome screen
5. Press the Tab key to continue.
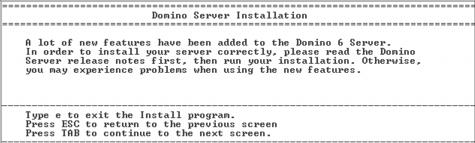
Figure 6-10 Domino Welcome screen with New Feature Alert
6. You'll see a couple of Licence Agreement screens next. The next screen (Figure 6-11) asks you to read the full licence agreement. Press the Tab key to display the License agreement, then scroll down by using any key.
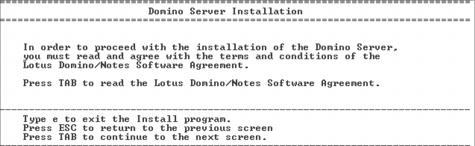
Figure 6-11 Licence Agreement screen
At the end of these screens, press Tab to validate your agreement or use Esc to go back to the previous screen.
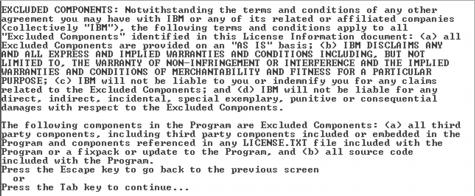
Figure 6-12 Licence Agreement validation
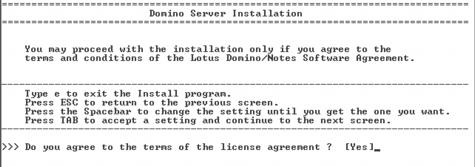
Figure 6-13 Last screen for licence agreement validation
Select Yes to accept the License agreement and to continue with the installation.
7. Installation of Data Directories only.
You have to select Yes if you want to add only new data directories to an existing Domino server. By default the answer is No; if you select Yes, be aware that no Domino code will be installed. If you are upgrading your Domino server, you don't need to change the default settings, just press Tab to continue.
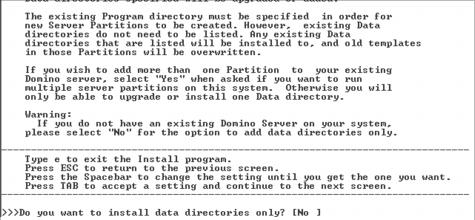
Figure 6-14 Installation of Data Directories only
8. Select the type of Domino Server to install.
As mentioned earlier, you have to select between the three new types when installing the Domino server. The default selection is Domino Messaging; to select another type, use the spacebar and press Tab when your selection is identified. In our scenario, we selected Domino Enterprise server.
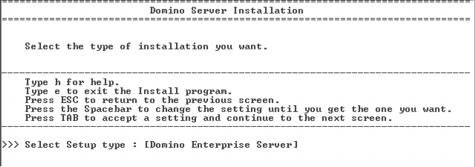
Figure 6-15 Type of Domino Server to install screen
9. Install template files.
You can choose whether to install template files that are shipped with Domino server. This additional option is intended for administrators who are installing over a previous version of the Domino 6 server and wish to keep all the existing template files. In our case, since this is not an installation over an existing Domino 6 server, all the templates have to be installed. If needed, templates can be replaced by customized templates at the end of installation.
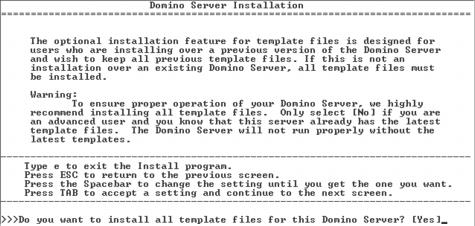
Figure 6-16 Installation of template files screen
10. Install an Application Service Provider kit (ASP).
This option allows you to configure a server as an Application Service Provider server. This type of server can only be configured after an Enterprise Server installation. The default selection is No.
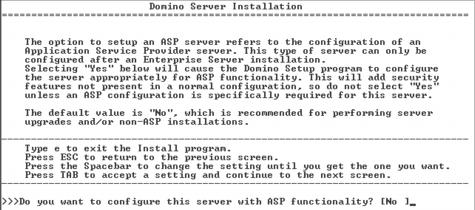
Figure 6-17 Configuration of Application Service Provider server screen
11. Select the directory location for the Domino binaries.
The default directory is /opt/lotus, and we accepted this for our installation.
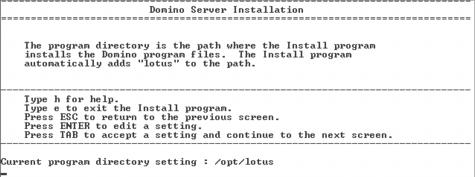
Figure 6-18 Directory location for Domino binaries
With R5, you did not have to install the program files to /opt/lotus, but the server required an /opt/lotus symbolic link to function properly. Domino 6 no longer requires the /opt/lotus link, and so Domino 6 can coexist with R5 (still using /opt/lotus) or with other installations of Domino 6.
Table 6-2
Version of Domino --> Program file installation path
Domino R5 --> /opt/lotus
Domino 6.0 --> /opt/dom6a/lotus
Domino 6.0.1 --> /opt/dom6b/lotus
Example of multiple installations
Important: If you have Domino R5 installed on a server, then even if the program files are not installed in /opt/lotus, you cannot install Domino 6 to that directory. Doing so will overwrite the symbolic link and the R5 install will no longer function properly.
You can change the location of your Domino binaries. To do this, press Enter, type your new directory path, and validate by pressing Enter again. The install program will append "lotus" to the end of your new directory path automatically.
For our single server, we chose to install only one version of Domino 6, so we pressed Tab to accept the default path.
12. Setup for partitioned Domino servers.
The next two screens concern the setup for a partitioned server on the machine. The default answer is No. For this example, we chose not to partition it and just pressed Tab to continue.
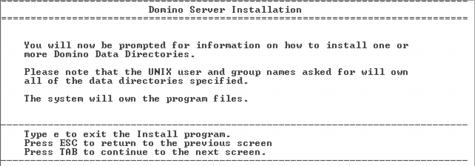
Figure 6-19 Entering into the Partitioned installation screen
While Domino 6 gives you the ability to run different versions of Domino on a single server, you still have the option to partition a server. If you partition the server, multiple instances of Domino will share one set of program files but each installation will have a separate data directory. The new Domino 6 feature that allows multiple installs requires separate program files, as well as separate data directories, for every instance, and so requires more disk space than partitioning.
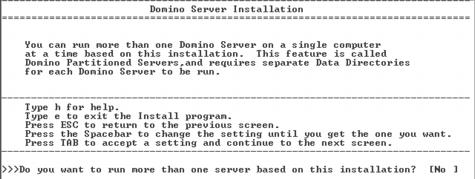
Figure 6-20 Domino partition option screen
13. Select your data directory
You are now prompted to indicate where your Domino data directory is located. By default the path is /local/notesdata. You can edit this path by pressing Enter, entering the path, and validating the new path by pressing Enter. Press Tab to proceed to the next screen. On our server the data directory is /domino/data.
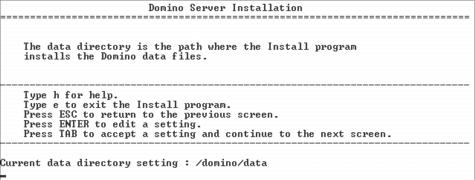
Figure 6-21 Selection of your data directory path
14. Select the UNIX user who will run the Domino server.
The default user is "notes." If you want to change it, press Enter, edit your user's name, press Enter again to validate, and then press Tab.
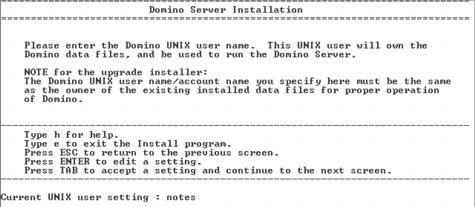
Figure 6-22 Unix User selection
15. Select the UNIX group.
Select the appropriate UNIX group containing the UNIX users that will run the Domino server. By default the selection is "notes." To edit this selection, press Enter, enter the appropriate group name, validate by pressing Enter, and press Tab to continue to the next screen.
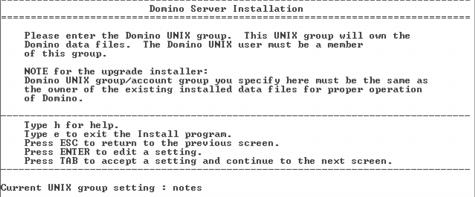
Figure 6-23 UNIX group selection
16. Configuration review.
The following screen displays all settings that you have selected. If you agree with these choices press Tab to start the installation, otherwise press the Esc key to reconfigure, if needed.
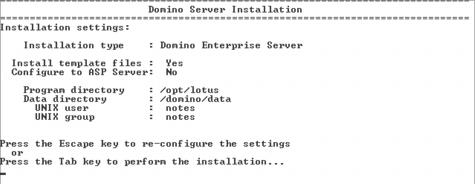
Figure 6-24 Configuration review for final validation
17. Code installation.
After validating this last screen, the perl script checks whether your system runs the appropriate patches or APARs. If everything is correct no list will be displayed. However, if any patches or APARs are missing, the installation will proceed anyway, but you will not be able to launch your Domino server until you have applied the requested missing files.
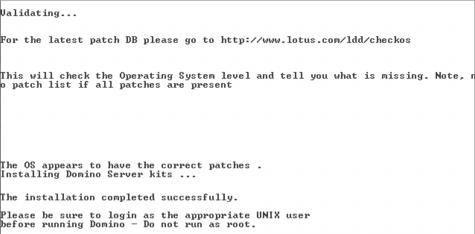
Figure 6-25 Domino installation complete
Tip: If you want to ensure that you have all patches and APARS installed before upgrading any UNIX servers, you can download:
Check OS tool
This is the same script that is run during the installation.
|